CHAPTER 12
Models 06-10: Liquidity and Entry
These five are liquidity-driven. Once you understand them you will understand why price comes back at all.
Model 06 - Asian Range Sweep and London Reversal
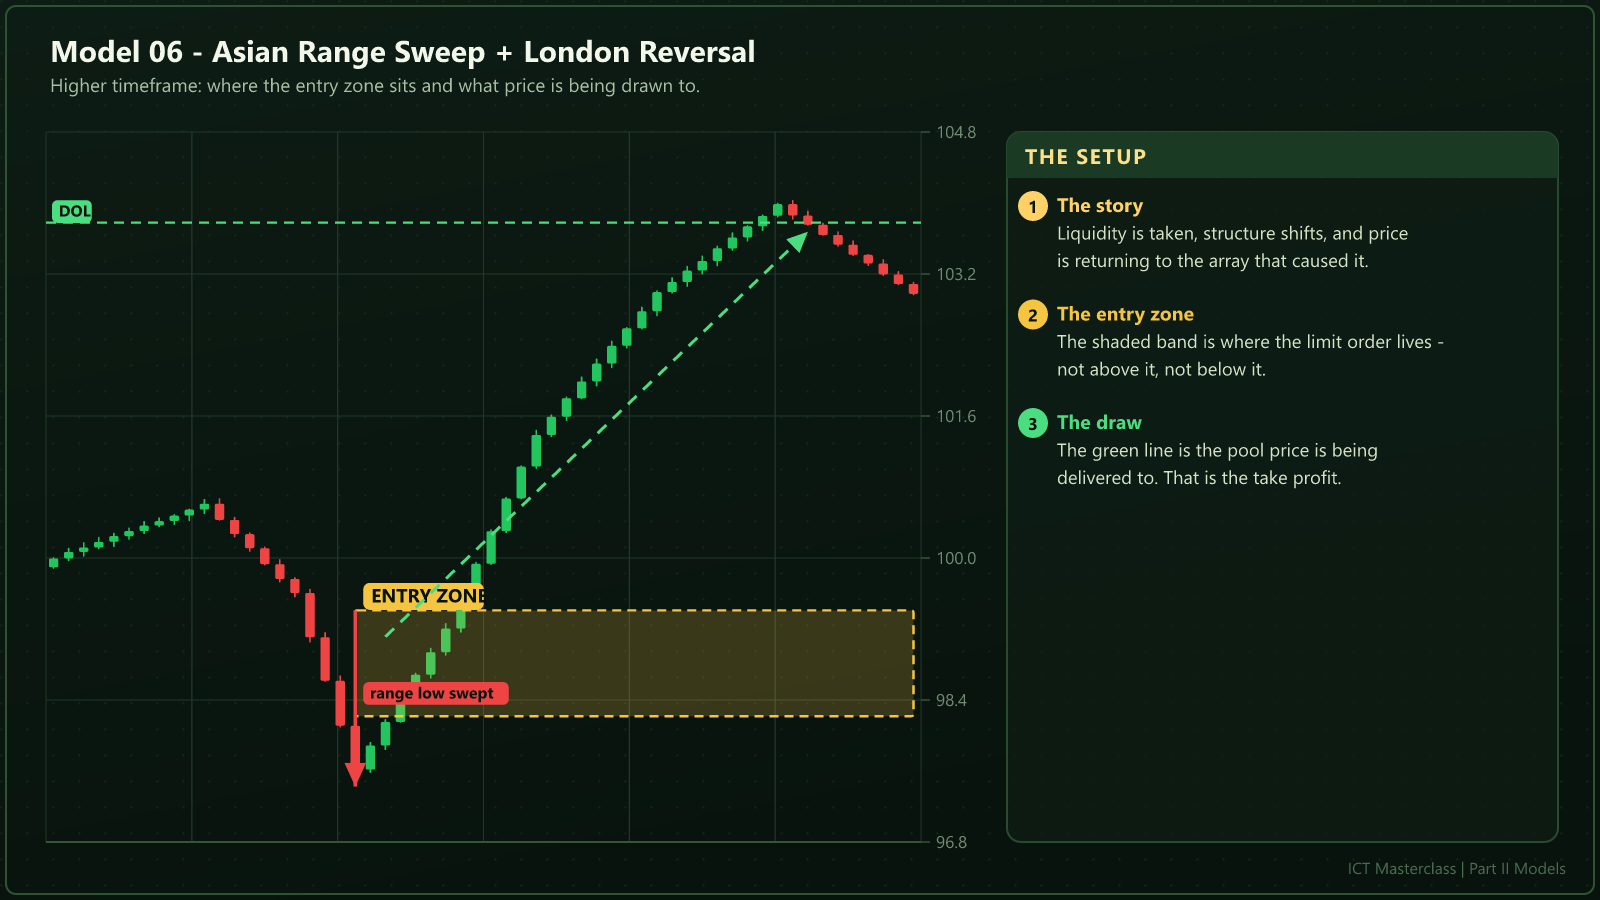
Asia builds a narrow range. At the London open price breaks one edge to collect stops, then closes back inside and delivers the other way. It is the most common structural pattern of the day.
| Timeframe | What to look for |
|---|---|
1H | Mark the Asian range boundaries |
15m | Sweep confirmation |
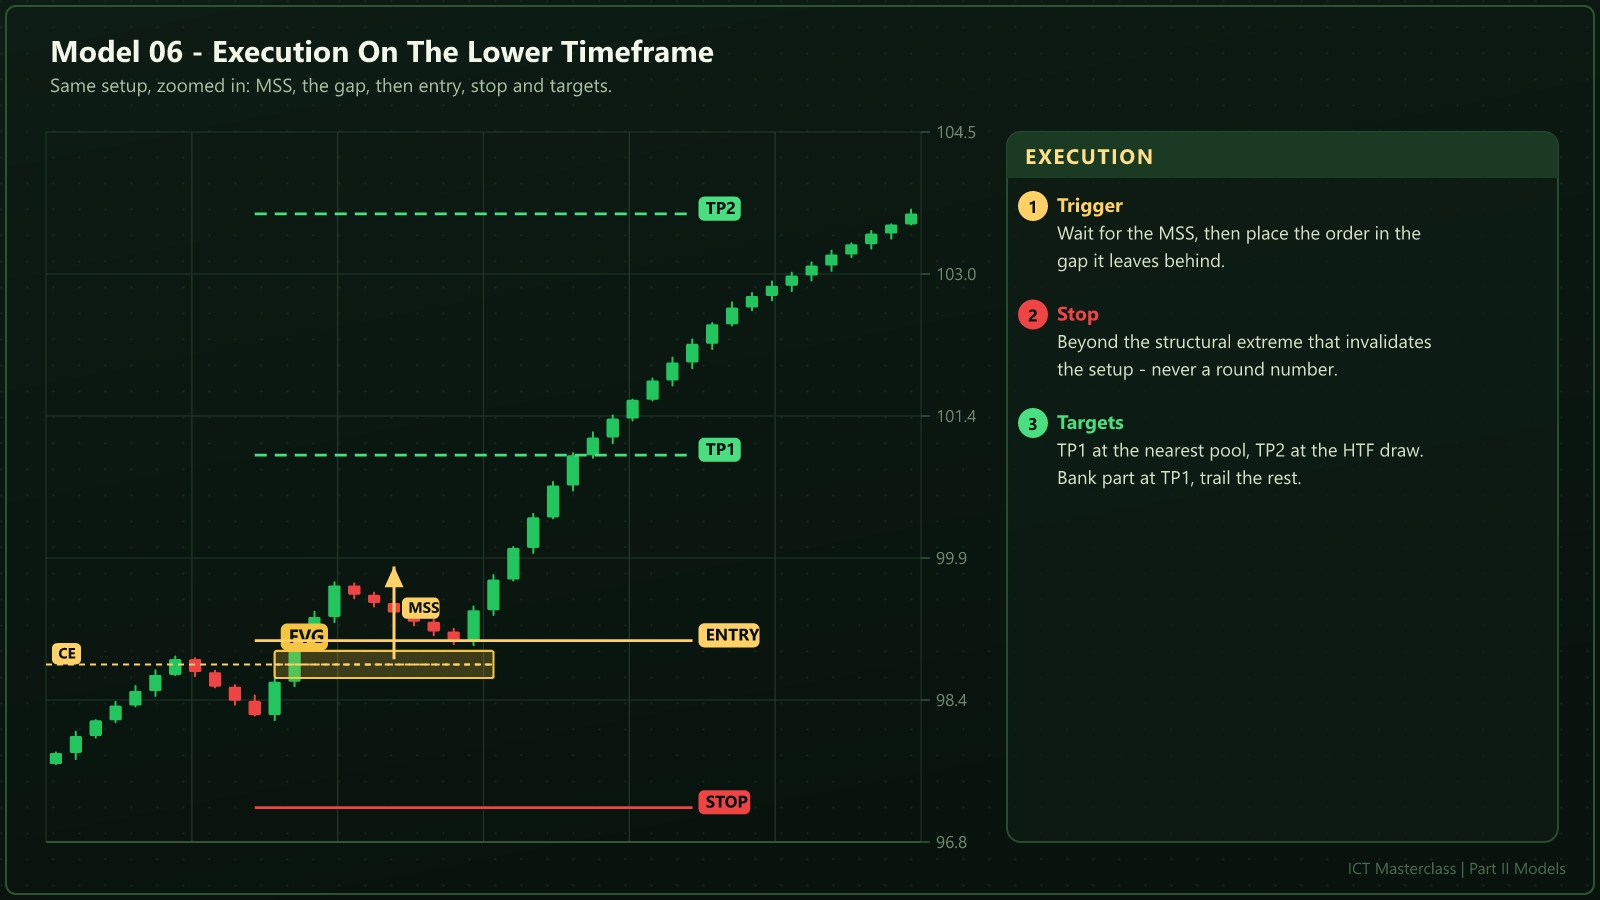
5m | MSS and FVG |
1m | Precision entry |
Entry Rules
- Write down the Asian high and low.
- Wait for a sweep of one edge in London.
- Enter when price returns inside and prints an MSS.
- TP1 at the opposite edge, TP2 at the London extension.
| Level | Distance | What to do |
|---|---|---|
Entry | FVG | After the sweep |
Stop | Beyond the sweep | 5-10 pips past the range |
TP1 | 1:1.5 | The opposite edge |
TP2 | 1:3 | The London extension |
Conditions and Invalidation
- The narrower the range, the more reliable the reversal.
- No sweep, no trade.
- Within the first 30 minutes of the London open.
Model 07 - Turtle Soup (Liquidity Raid Reversal)
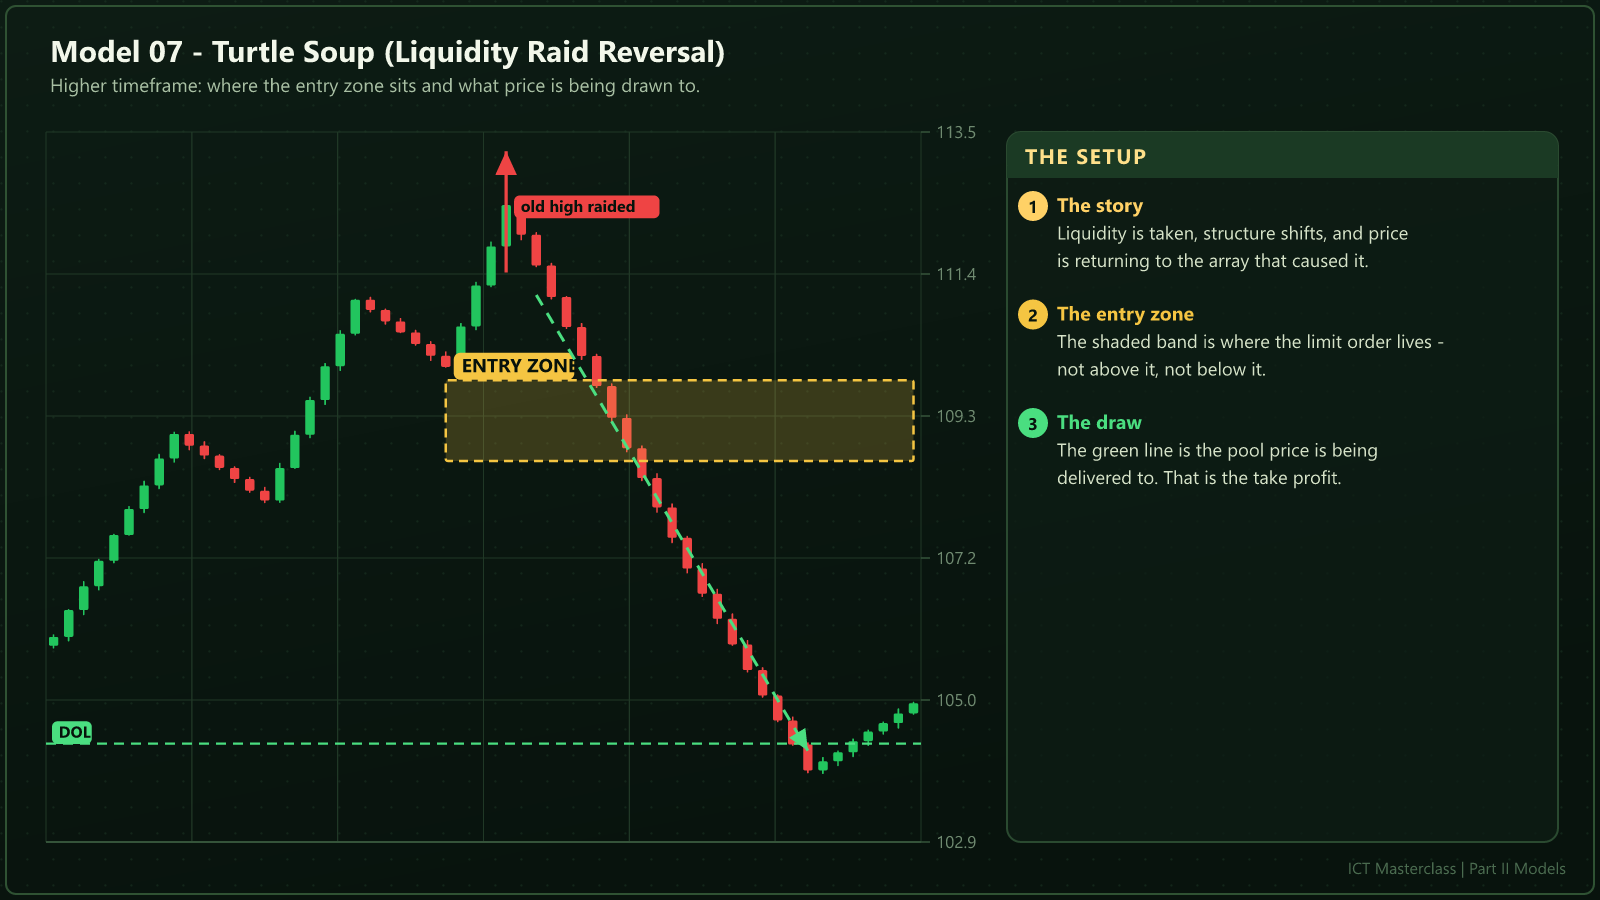
An old high or low breaks by a small margin, then immediately reverses - that is turtle soup. The name is old but the idea is core ICT: not a breakout, a trap.
| Timeframe | What to look for |
|---|---|
Daily | Mark the old high or low |
1H | Raid confirmation |
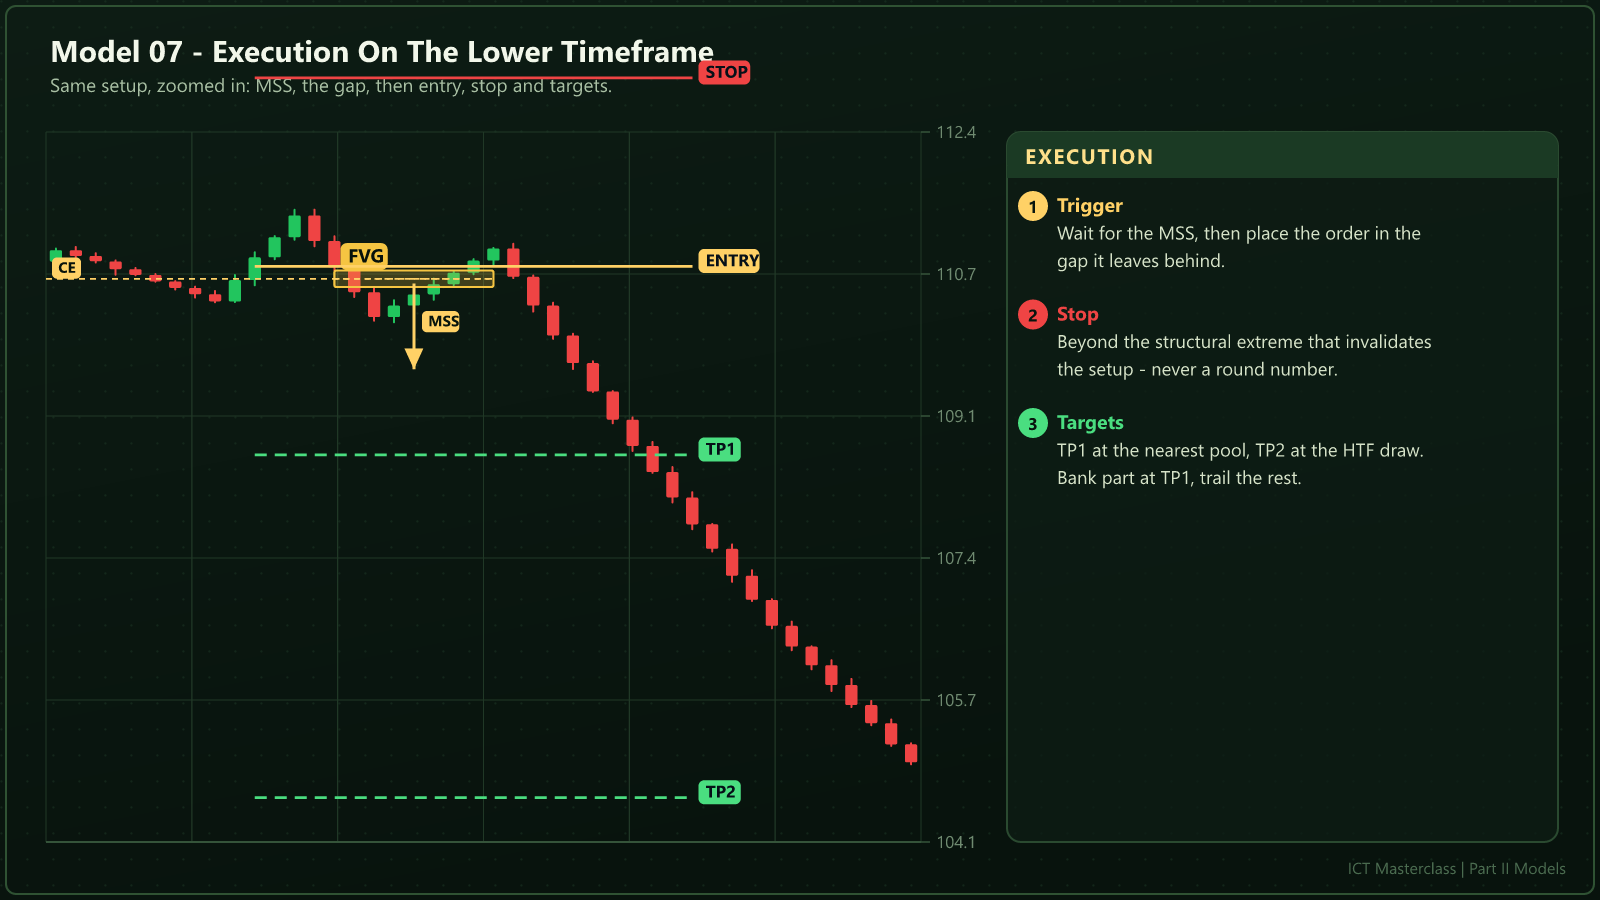
5m | MSS |
1m | Entry trigger |
Entry Rules
- Pick a level tested two or three times.
- After the raid, wait for a body back inside and an MSS.
- Enter the FVG, stop 5 pips beyond the raid.
- Target the opposite side of the range.
| Level | Distance | What to do |
|---|---|---|
Entry | FVG | After the raid |
Stop | 10 pips | Beyond the raid |
TP1 | 1:2.5 | Mid range |
TP2 | 1:5 | The opposite pool |
Conditions and Invalidation
- The raid must be small - 10 to 15 percent of the range.
- Best when the raid happens inside a killzone.
- Not before major news.
Model 08 - OTE Continuation
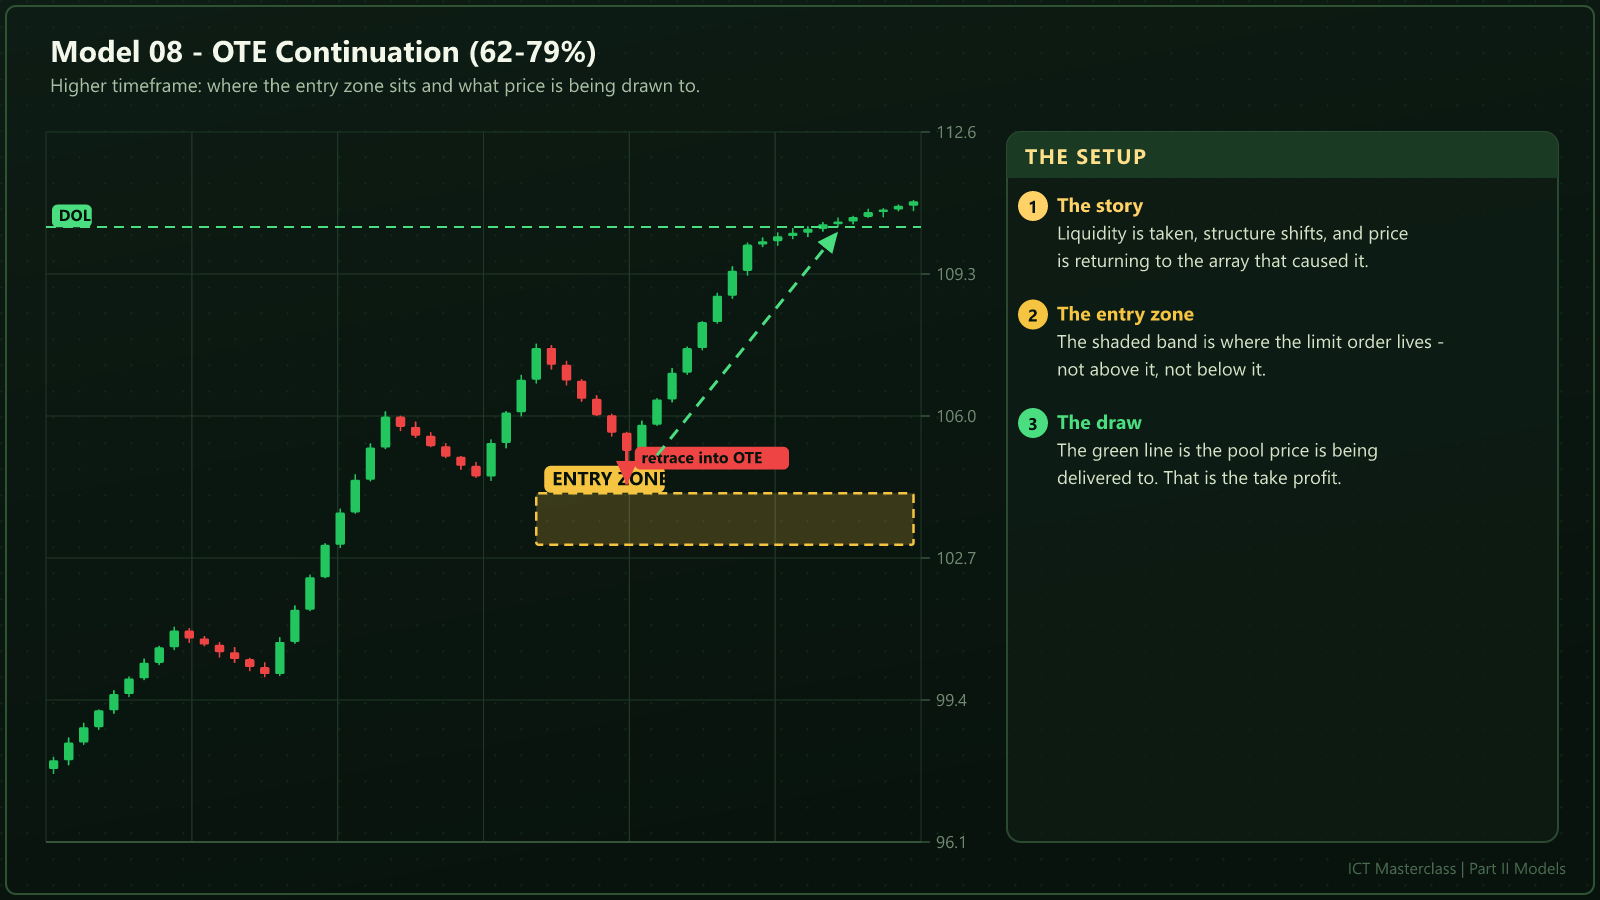
After a BOS, price retraces 62 to 79 percent. Entering there with the HTF bias keeps risk small and reward large. It is the most instructive model because structure, range and Fibonacci work together.
| Timeframe | What to look for |
|---|---|
4H | Trend and draw |
1H | BOS, swing marks and the OTE |
5m | MSS confirmation |
1m | FVG entry |
Entry Rules
- Find a clean BOS - a body close.
- Draw Fibonacci from the swing low to the high.
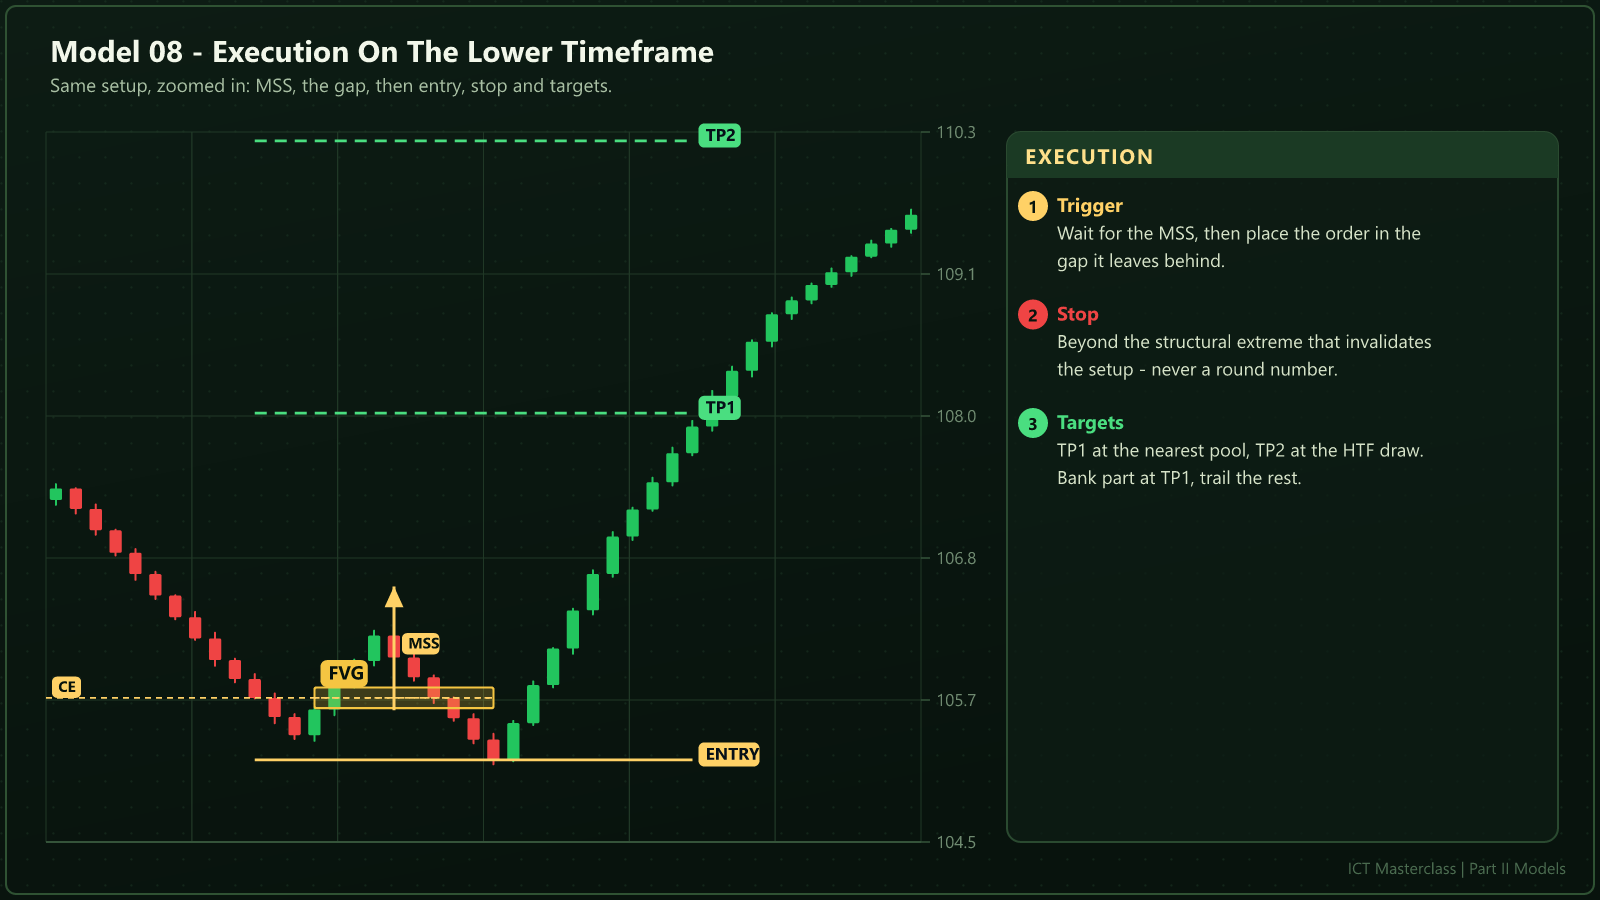
- Wait for a five-minute MSS inside the 62-79 percent zone.
- Limit in the FVG, stop below the swing low.
| Level | Distance | What to do |
|---|---|---|
Entry | 62-79% | A trigger is required |
Stop | 100% | Below the swing low |
TP1 | 1:2 | The BOS high |
TP2 | 1:3.5 | The next pool |
Conditions and Invalidation
- If the retracement goes beyond 100 percent, OTE is void.
- Do not wait more than three candles after the BOS.
Model 09 - Order Block and FVG Stack
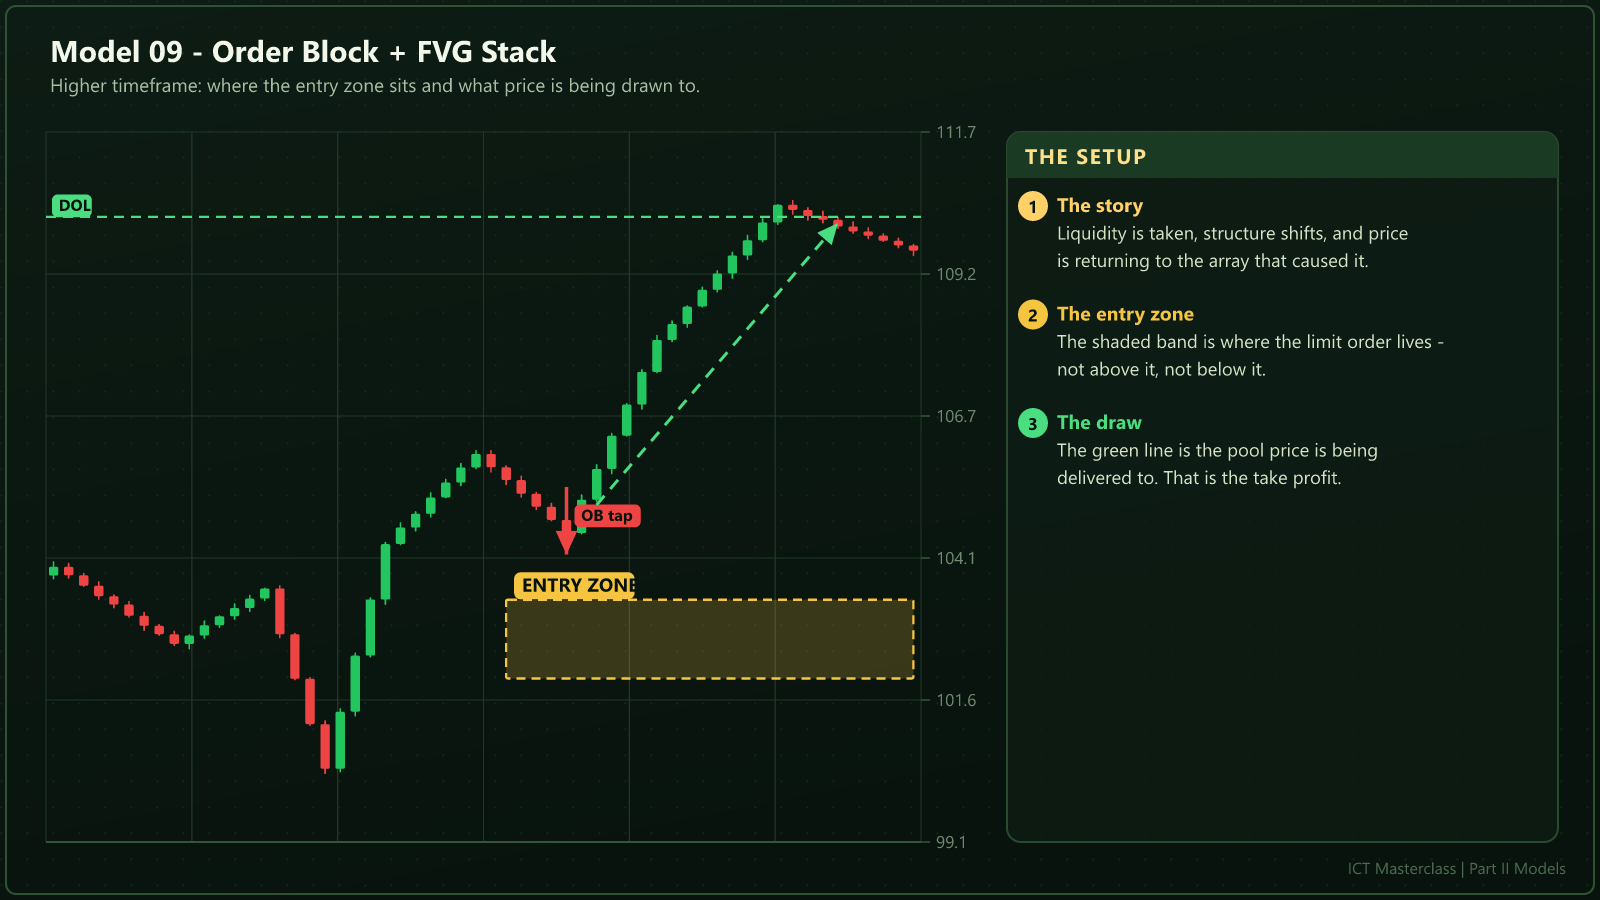
When an order block and an FVG share the same price, two independent reasons point to one decision. This is an A+ setup and produces the best R.
| Timeframe | What to look for |
|---|---|
4H | Mark the order block |
1H | Check the FVG overlap |
15m | Confirm the zone |
5m | MSS and entry |
Entry Rules
- Write the OB boundary and the FVG boundary.
- Their overlap is the entry zone.
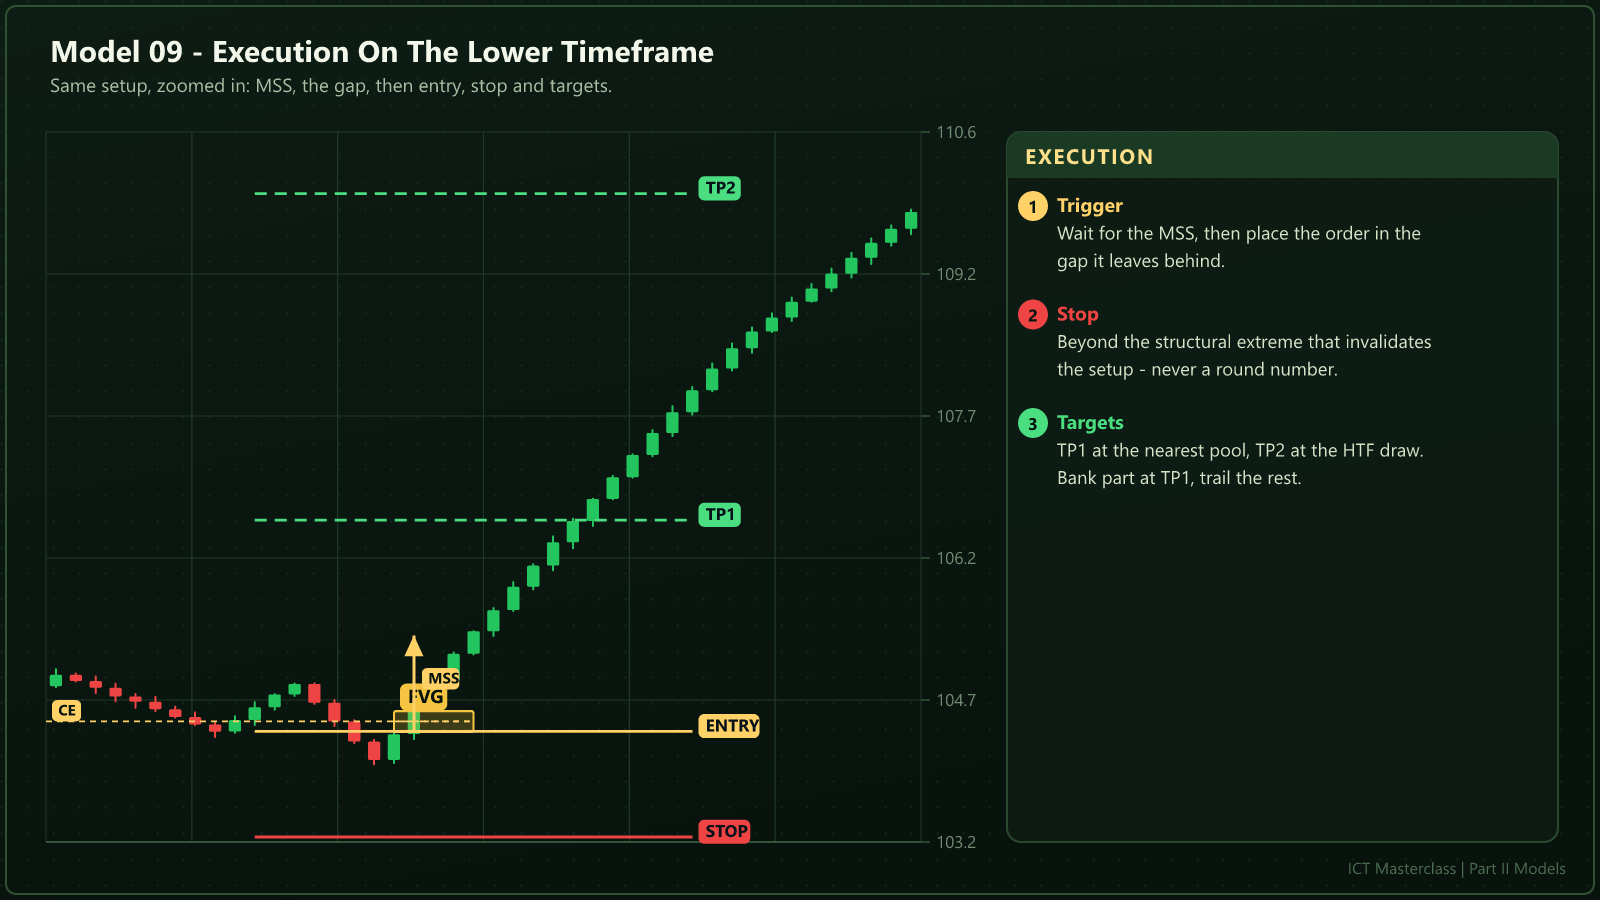
- Limit at the CE, stop beyond the OB.
- TP1 at the nearest pool, TP2 at the draw.
| Level | Distance | What to do |
|---|---|---|
Entry | OB and FVG overlap | Limit |
Stop | Beyond the OB | 15-30 pips |
TP1 | 1:2 | Nearest pool |
TP2 | 1:4 | The HTF draw |
Conditions and Invalidation
- The OB must sit in discount for longs, premium for shorts.
- Confirm the OB was created inside a killzone.
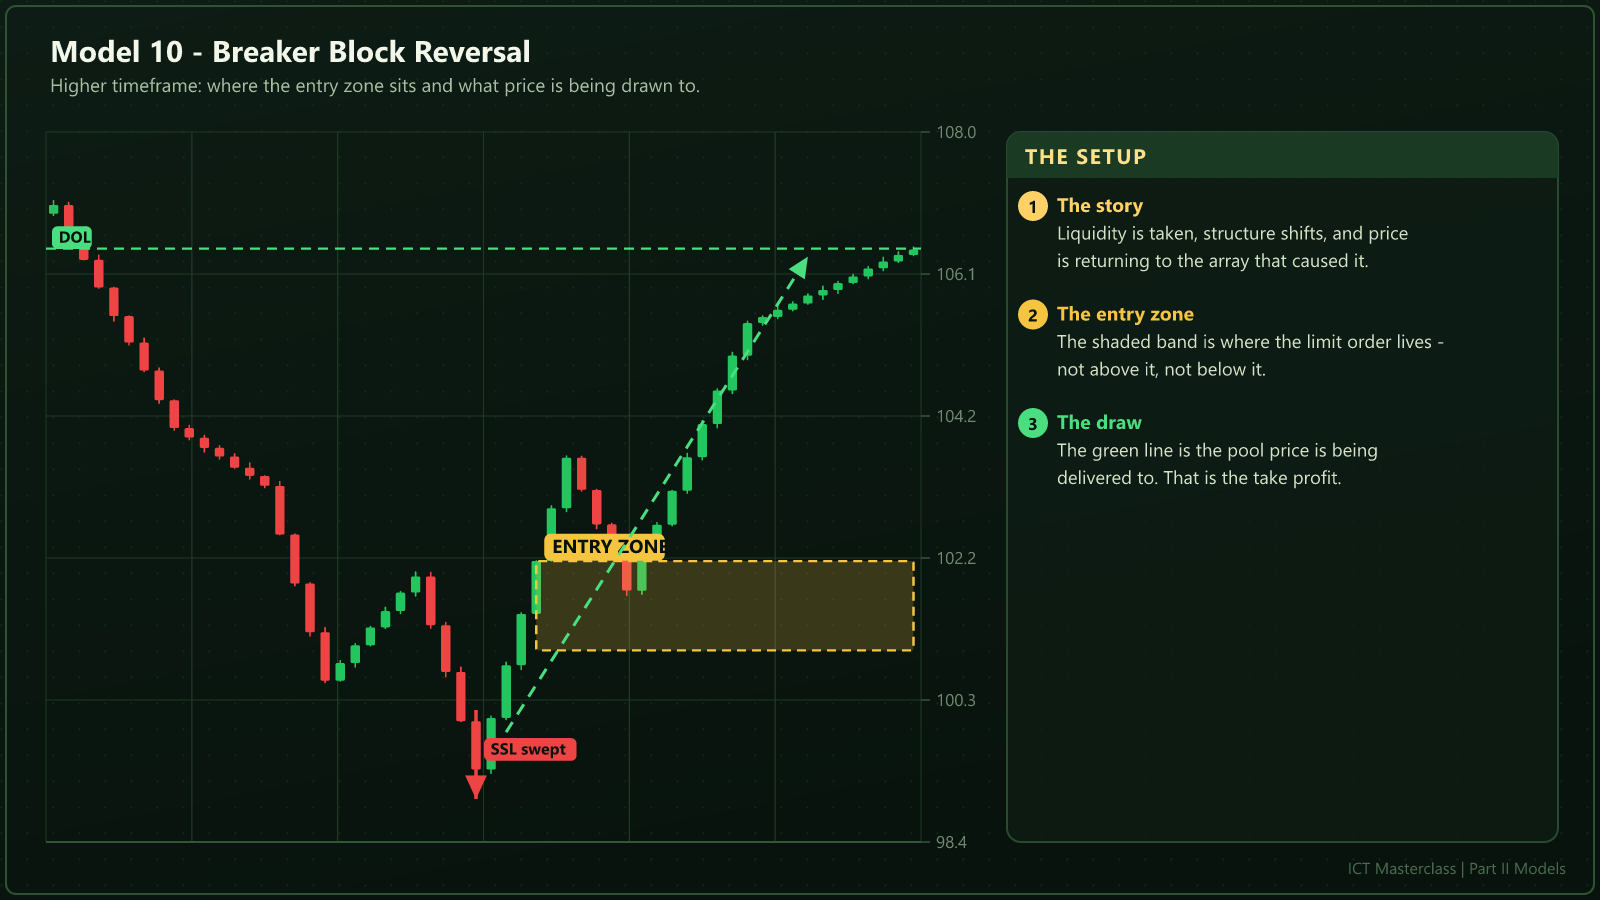
Model 10 - Breaker Block Reversal
When an order block fails, the stops of the trapped traders become fuel for the new direction. The return to that failed zone is the lowest-risk entry in ICT.
| Timeframe | What to look for |
|---|---|
4H | Identify the failed order block |
1H | Confirm the break |
5m | Retest and MSS |
1m | Entry |
Entry Rules
- Find where an OB broke with a body close.
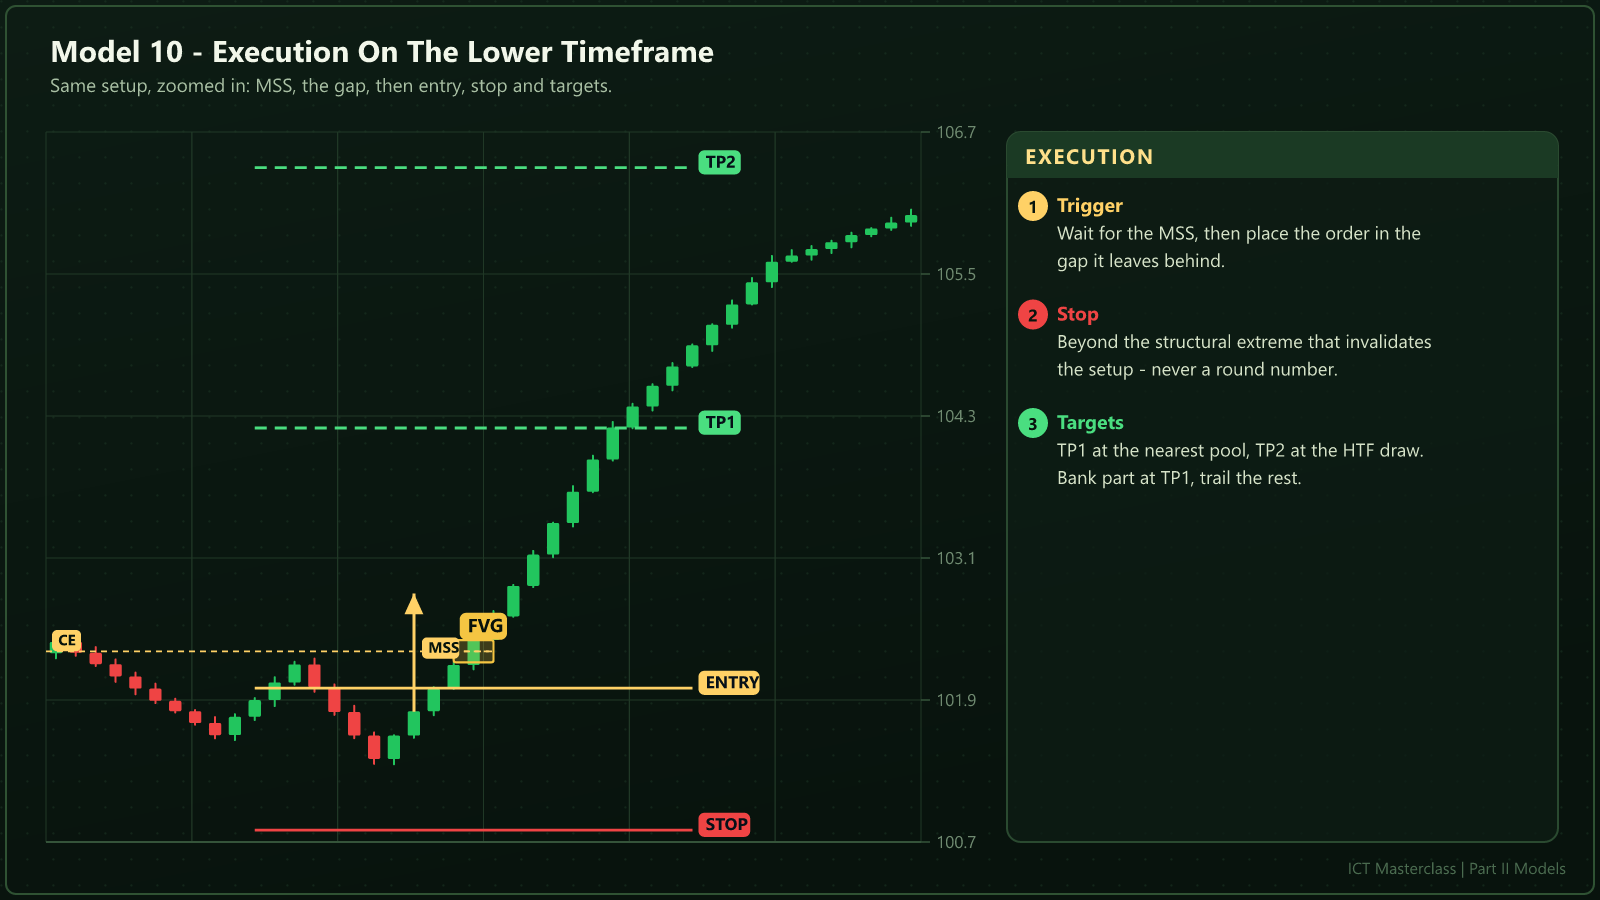
- When price returns, look for a five-minute MSS.
- Enter the gap or CE, stop beyond the zone.
- TP1 at the nearest swing, TP2 at the draw.
| Level | Distance | What to do |
|---|---|---|
Entry | Breaker | On the retest |
Stop | Beyond the zone | 20-30 pips |
TP1 | 1:2 | Nearest swing |
TP2 | 1:4 | The draw |
Conditions and Invalidation
- Best when the breaker aligns with a liquidity sweep.
- The first retest is the best one.
Educational material only · not financial advice.